|
In this section
Choosing your interface - Classic or Treeview mode
The Main Menu and starting programs
The TreeView Program Selection Menu
Changing the photo displayed in Treeview mode
Changing the background for text (Treeview mode)
Treeview Favourites
Treeview Favourites and the Show Program Names Option
Renaming Programs in the TreeView
About Resizing and Repositioning screens
About Resizing and Repositioning the Main Menu
Overriding the Global Font sizes
About Window Shading
About Program Versions
Users
Preferences
Choosing
your interface - Classic or Treeview
Ideas Genie allows you to choose from two interfaces (i.e. what you see on start up):
- Classic
This option provides the same look and feel as Ideas Genie 3
- Treeview
This new alternative allows you to expand and collapse the program options, and more
In both cases, the Menu is ever present at the top of the startup screen.
You can choose your Interface in Preferences and you can change from one interface to the other at any time
The Main Menu and starting Programs
The Main Menu appears
along the top of the screen.
Click on a Menu tab, then click on an option in the drop down list to select and start a program.
Note: The Ideas Genie application is made up of a suite of individual programs.
Unlike
the TreeView Program Selection Menu (below) programs (options on the Menu tabs) cannot be hidden.
When you are running one program, you can click on the
Menu Tab (or the Treeview) to select and run another program.
i.e. You dont have to close the first program before opening the second.
If you run a
program and click buttons which open sub screens, these screens are said to cascade.
You dont have to close cascaded screens in reverse order.
You can click
on any visible screen in the cascade. Screens lower in the cascade close automatically.
The TreeView Program Selection Menu
The TreeView Program Selection Menu is positioned on the left of the
Initial Screen when you start Ideas Genie using this option.
The Items with + icons correspond to tabs on the Main Menu
Click on a + sign to expand the options, then click an option to run a program.
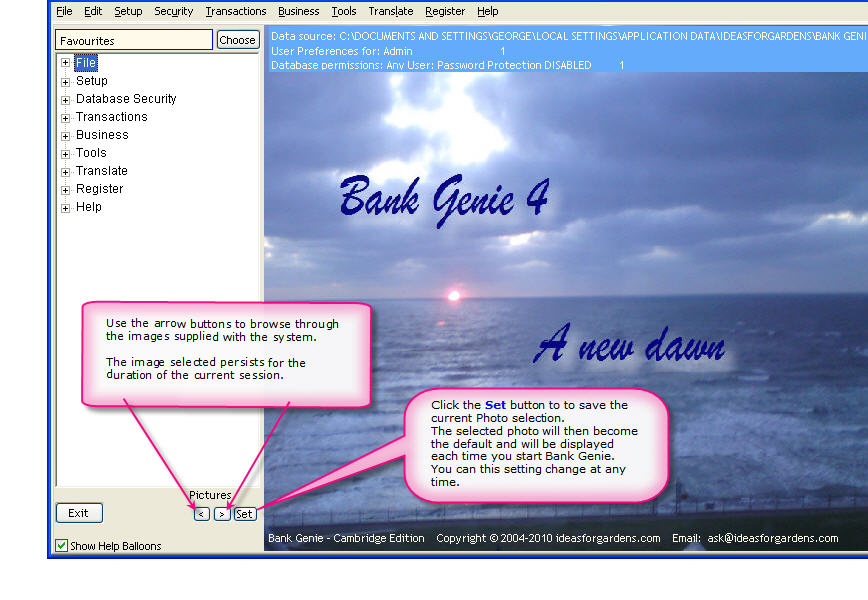
Changing the photo displayed in Treeview mode
Use
the arrow keys below the Treeview to browse through the images supplied with Ideas Genie.
Screenshot
Use the Set button if you wish to make your selection the default.
Using your own photos with Ideas Genie
You can personalise the system with your own photos.
The instructions are explained on this page
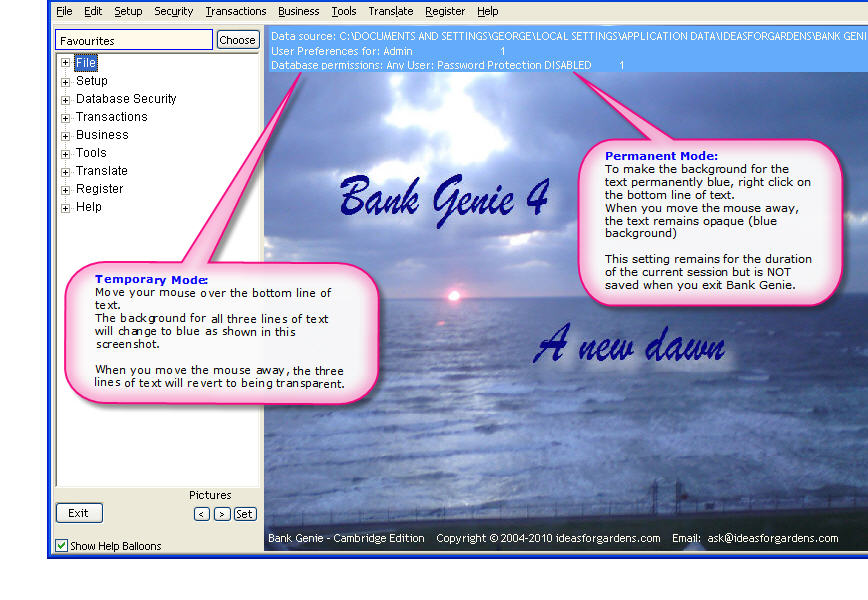
Changing the background for the text shown on the Image in Treeview mode
Three lines of information are shown at the top of the screen, on top of the image
Screenshot
- Data Source
- The name of the Active User
- Information about the Database Security settings
The text is shown on a transparent background on top of the image.
If the text is difficult to read on your preferred image, simply move the mouse over the
bottom line of text.
The text is then displayed on an opaque Blue background, until you move the mouse away.
To make the blue opaque background persist,
right click on the bottom line of text.
See this Screenshot
TreeView favourites
You can personalise the Treeview by hiding Programs which you rarely
use.
Clicking on Choose (the button beside Favourites) takes you to screen MainFrm2
In that screen, doubleclick on a line to select/deselect programs, thus personalising the list of programs displayed in the Tree View. The changes are
saved each time you doubleclick.
When you close screen MainFrm2, ONLY items prefixed ***Favourite*** are shown in the treeview
You can click Choose
and change your Favourites at any time.
Note: The Main Menu options are NOT affected by the selections you make in choosing Favourites.
Favourites and the Show Program Names option
For support
purposes, each program in the Ideas Genie system has a short 5 character program name.
This program name is preferred when discussing topics in the forum,
and is required when contact ideasforgardens.com for support.
You an opt to hide it (as a suffix) in the TreeView.
Click on Choose
(the button beside Favourites) to open screen MainFrm2
Check or Uncheck the Show Program Names
checkbox as you prefer.
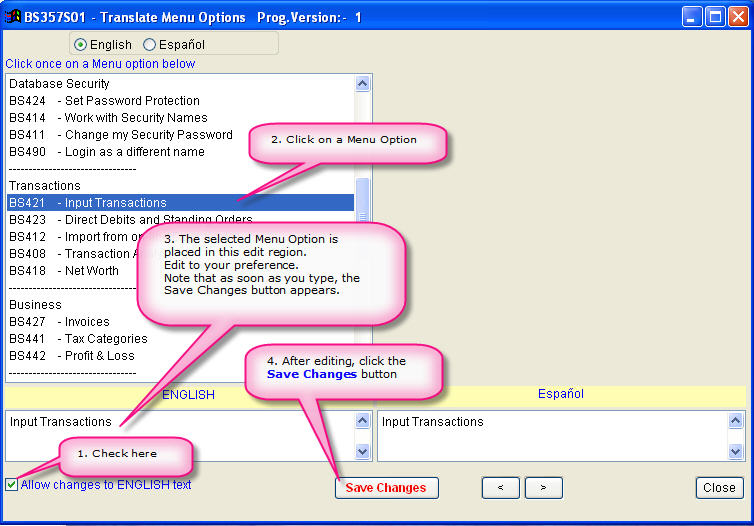
Renaming Programs in the TreeView.
You can change the text element of Program Names to your own preference.
On the main menu, click the Translate tab and start the program:
Menu
Options - BS357
Screenshot
- Check the checkbox Allow changes to ENGLISH text
- Click on the Menu Option you wish to change in Menu Options list
- The Menu Option text is placed in the edit regions.
Edit the text in the ENGLISH text box.
- Click the Save Changes button
The changes are immediately effective (You may have to collapse and expand the node containing the Program Name)
The changes made apply to all Users of the
system.
When referring to a program in communication, please use the 5 digit program name e.g. GA604
Do not quote your own names for programs.
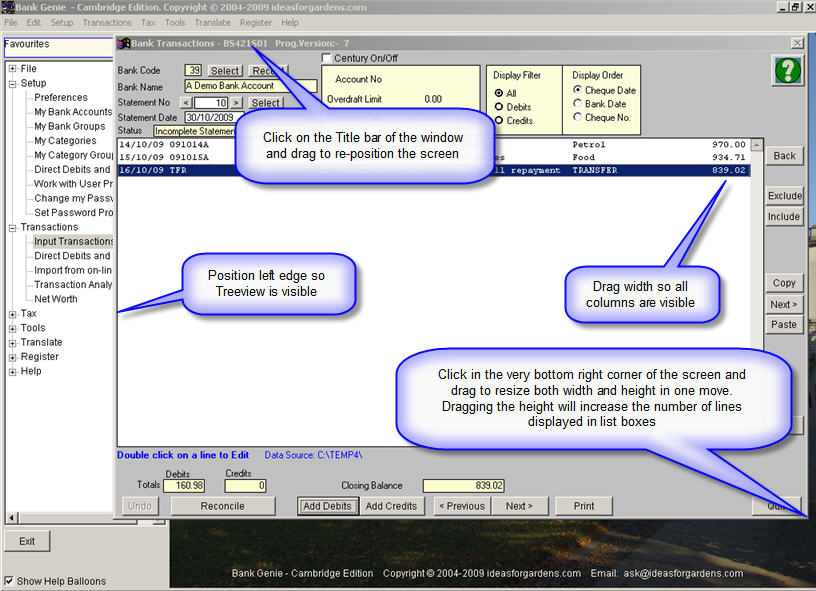
About Resizing and Repositioning screens
All screens in Ideas Genie programs are resizable and can be dragged to any position.
When you resize a screen, or reposition a screen, the settings are saved
on closing that screen.
Thus, next time you run a program, the sizes and settings are applied.
Since sub-screens cascade as you open them, you can
organise them in any manner you prefer.
We recommend you do this when you start a program:
Click and hold on the Title Bar, then drag to position
the initial screen
Position the LEFT of the initial screen so that the Treeview is visible.
Position the TOP of the initial screen so that the left of the screen leaves the Treeview visible.
There are three ways you can resize windows.
- Click on the extreme right edge of the window so that a small 2 headed horizontal arrow appears
Drag to make the screen wider or smaller if
necessary.
Make sure the screen is wide enough to see all the columns.
- Click on the extreme bottom edge of the window so that a small 2 headed vertical arrow appears and drag to change the height of the window.
- Click on the bottom right corner of the window so that a 2 headed arrow appears at 45 and drag to change both the height and the width of the window in one move
Note: If you click outside the window, the window will close. Restart the program and try again.
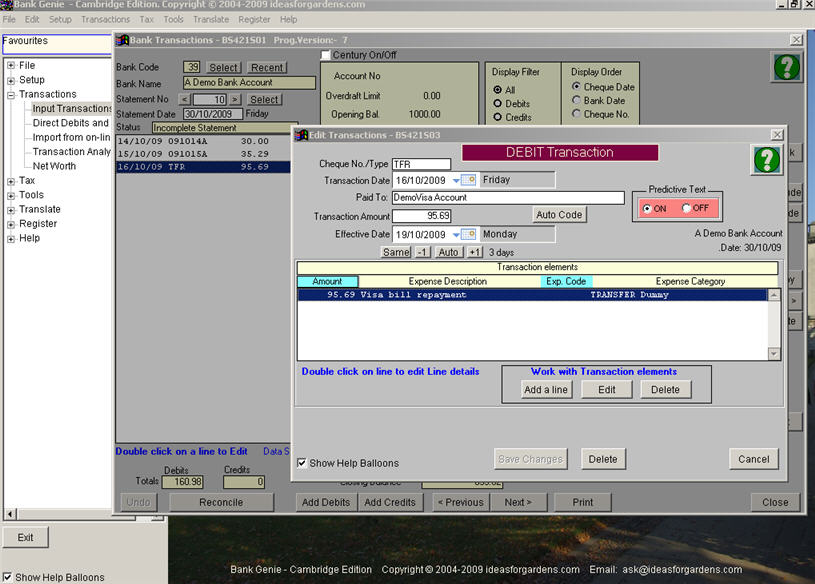
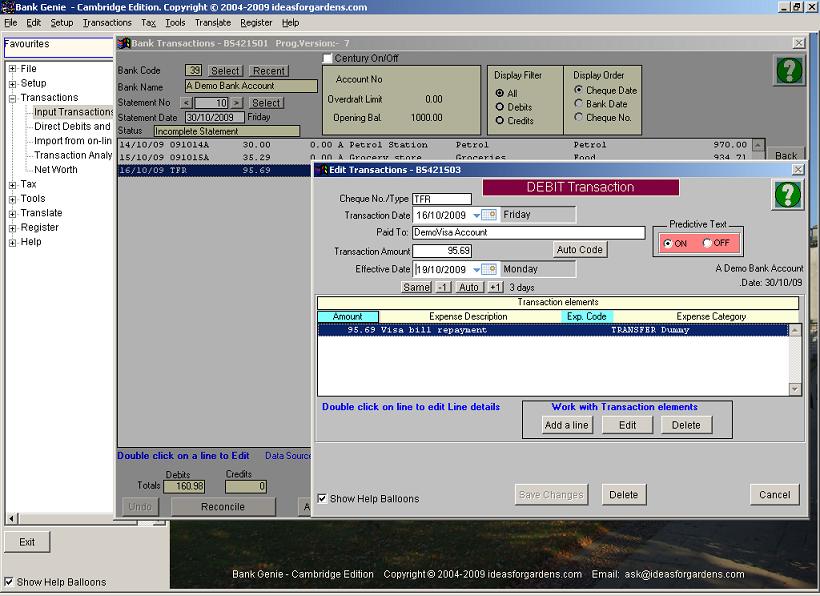
Using the previous program screen as an example, a new window will open when you double click on a line to edit a transaction. The new (child) window cascades from the parent (initial screen) and you get something like this:
Screen BS421S03 before repositioning
Heres a tip.
Note how you can see both the Cancel
button on the child screen and the Close
button on the parent screen in this screenshot.
That can be a little confusing.
Reposition and/or resize so that the screen hides the Close button on the parent screen like this:
Screen BS421S03 after repositoning
About Resizing and Repositioning the Main Screen
For purposes of this discussion, the Main screen is what you see when you start Ideas Genie.
In Windows, developers design their applications to start in
one of two modes:
- a) Normal
mode
The application may or may not fill the entire screen of the monitor on start up
- b) Maximised
The application fills the entire screen of the monitor on startup
Due to the behavior of Dual Screen Monitors, Ideas Genie ALWAYS starts in Normal
mode.
Initially, the size is the full screen size on a monitor set to 1024 x 768 pixels, so even the default size will be fine.
You can make the Ideas Genie Main screen larger - recommended if you set Ideas Genie to display your data with large font sizes (see Preferences) or if you have a wide screen monitor.
The method to make the Main screen larger depends on your hardware configuration.
- If you have a SINGLE monitor you have two options.
If you want Ideas Genie to fill your monitor screen refer to this screenshot:
Screenshot
MainScreen-2-maximise
If you want to adjust the Ideas Genie Main screen to your own dimensions refer to
this screenshot: Screenshot
Mainscreen-1-resize
- If you have DUAL MONITORS refer to this screenshot:
Screenshot Mainscreen-1-resize
In either case, this Main Screen setting is saved when you exit the program.
When you restart Ideas Genie:
- The program will open in Normal mode (ALWAYS!)
- However!!
the Main Screen size and position will be as you set it last time you used Ideas Genie.
- The settings are stored for each user
- If you add a new user, the new user can adjust the Main Screen size to his/her own preference.
Please note:
When you open programs within Ideas Genie, they are “contained”
within the boundaries of the main Screen. Some screens in Ideas Genie need to be dragged quite wide to allow you to see all data columns. The larger the font size
you select in preferences, the wider the screen needs to be.
In such cases, you may need to resize the Main Screen again to best work with the data.
For
these reasons, we advise that you don’t make the Main screen smaller than the default.
A matter of experimentation!
Overriding the Global Font sizes
Do Fonts and fontsizes selected in the
Preferences program apply to all screens in the system?
By default, yes, they are global. However, a unique feature in Bank Genie allows you to override the
global settings for specific screens.
Again, these exceptions are User Profile specific - User A and User B can have different settings.
Screen sizes
vary markedly in the system.
If a screen has only a few fields then (by design) it can be quite small.
If you have selected a large font size you can
easily double (and more) the size of a screen to accommodate the larger captions and fields.
On the other hand, a screen which has numerous data fields or
wide list boxes is naturally large.
They cant be enlarged in the same proportions to accommodate very large font sizes.
The Ideas Genie solution:
On naturally large screens, we have provided a Font button.
Example: You can see the Font
button in this Screenshot -
Clicking that Font button leads to screen BS100S05
Referring to Screenshot 1 and Screenshot2
In
that screen you can select a smaller font size for that screen only.
This feature allows you to use a larger font size in other screens according to your global
settings.
About Window Shading
Using the previous screen as an example, have you noticed how the parent screen was shaded when you opened the child window?
The idea is that the child window stands out clearly from the parent.
Window shading is optional.
You can switch it On or Off in Preferences
Window shading does have a very slight “overhead” in that the program needs a very short amount of time to
create the shading before displaying the child window.
If you don’t like this effect, or you find this to be a problem on your computer, try switching
Window Shading OFF in Preferences.
About Program Versions
The Program Version is always shown in the title bar of the INITIAL screen of each program in Ideas Genie.
In this example screen, the Program version is
indicated as Prog.Version:- 7
It is important that you know how to determine program versions so you can keep up
to date with Program Updates on the Product Support Website.
Users
After you have become familiar with Ideas Genie you can personalise the system
e.g. you can change the default settings to your own preferences
(Font sizes etc).
Preferences
On the Setup tab on
the Main Menu, start the program Preferences - GA698
Set your preferences and click Save Changes
|
