|
A VERY quick look at Ideas Genie...
we will refer to the Menu options, top of screen.
- Before you start, read about how to return to the User Guide after looking at Screenshots
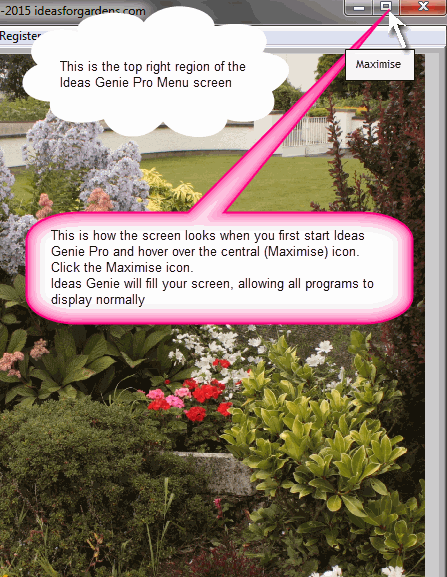
- If you have ONE monitor, Maximise the main screen as follows.
Screenshot for a Single monitor setup
VERY important
If you have DUAL screen monitors, do not use the Windows Maximise icon.
Instead, maximise the main screen as described in this screenshot:-
Screenshot for a DUAL MONITOR setup
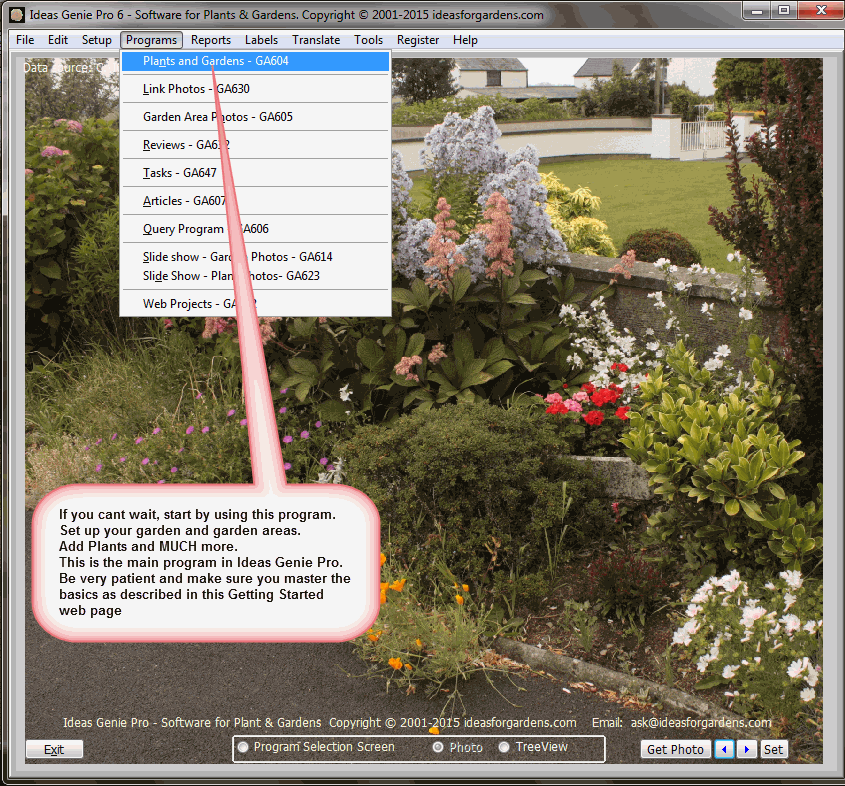
- Click the Programs tab on the menu.
Start the MAIN program - Plants and Gardens-GA604
Screenshot
The
initial screen GA604S01 will appear.
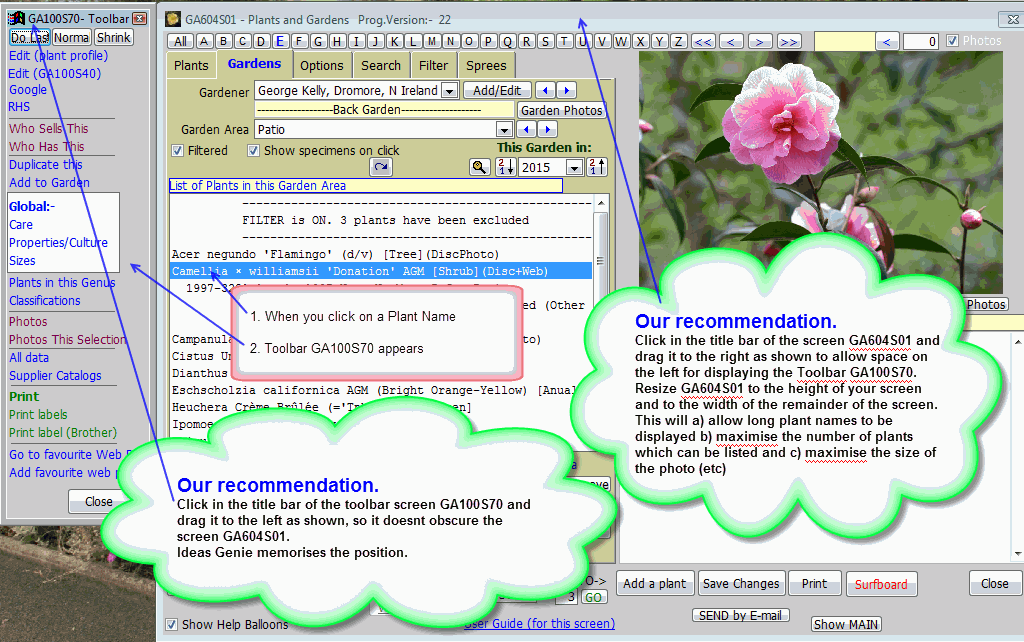
A Toolbar (screen GA100S70) may also appear in front of screen GA604S01
About Toolbar GA100S70
This toolbar appears when you click on a plant name.
Toolbars can be repositioned so as not to obscure screen GA604S01.
Ideas Genie memorises all screen sizes and positions.
Refer
to screenshot GA100S70-1 for our recommendation on how to control toolbar GA100S70
NOTE: The Toolbar GA100S70 will disappear if you click in “empty space” on screen GA604S01
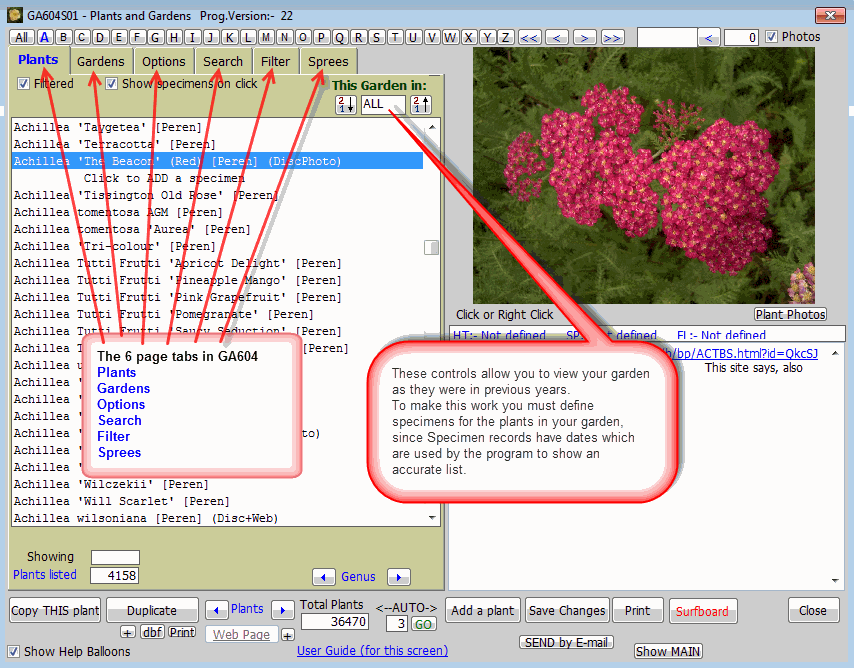
The Tabs in the program Plants and Gardens - GA604
Note that there are
6 tabs in the initial screen of program GA604.
Its the main program in Ideas Genie.
Referring to Screenshot GA604S01-4 we will concentrate on the first two tabs in this Getting Started article - the
Plants tab and the Gardens
tab.
Personalise Gardener Name and Garden Areas
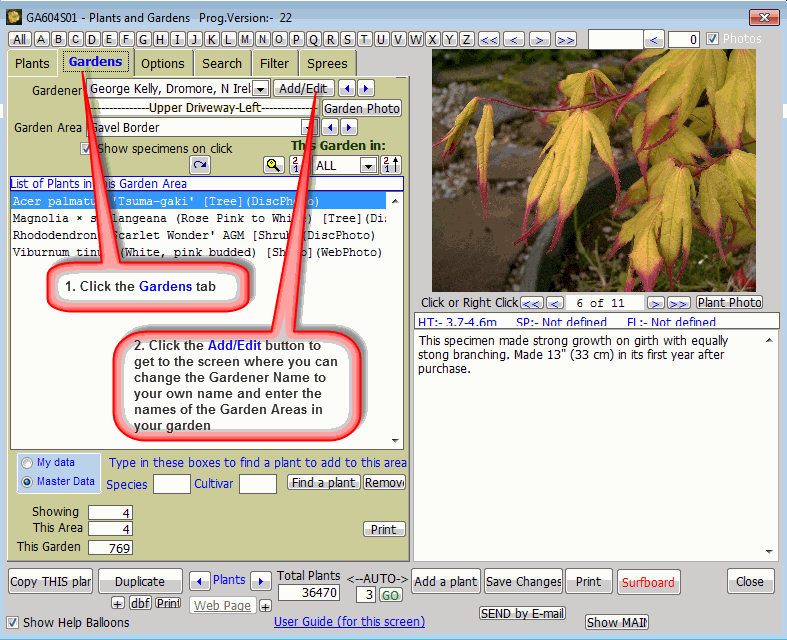
Referring
to Screenshot GA604S01-1, click the Gardens
tab, then click the Add/Edit button.
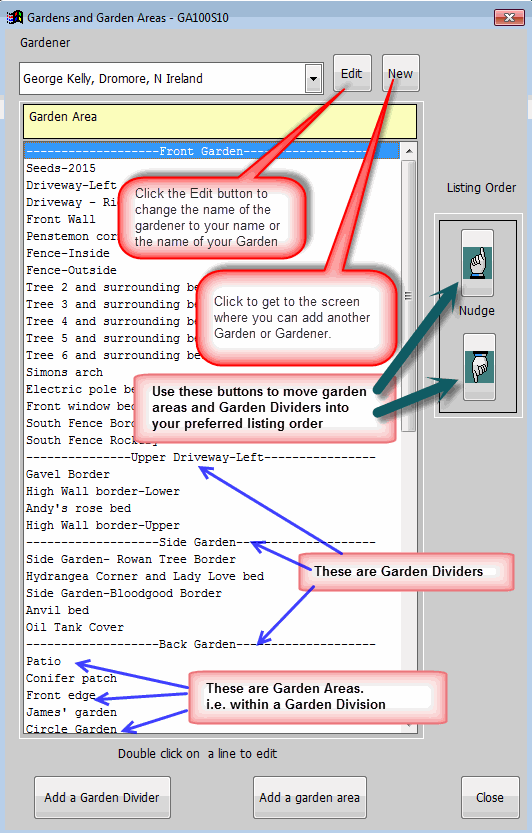
Screen GA100S10 will appear.
Referring to screenshot GA100S101-1, personalise the
name of the Gardener and start defining your Garden Divisons and Garden Areas.
You can change all of that later.
Add a Plant to a Garden Area as described in the following screenshots:
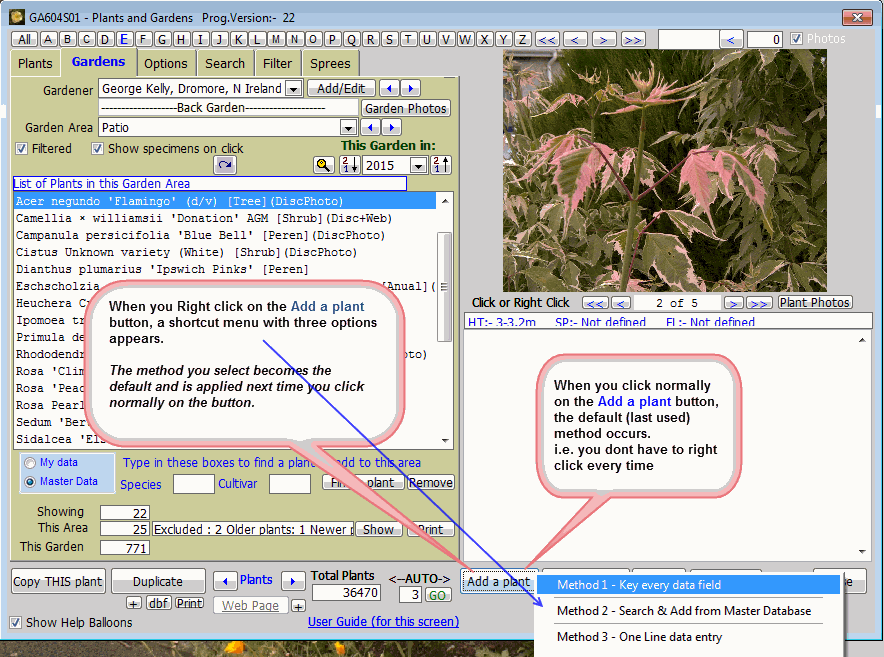
Referring to Screenshot GA604S01-2, click the Gardens tab.
Select a
Gardener and the Garden Area where you’d like to add a plant.
Then RIGHT click the Add a plant
button.
A shortcut menu with 3 methods will appear (see screenshot above).
For this exercise, select Method 2.
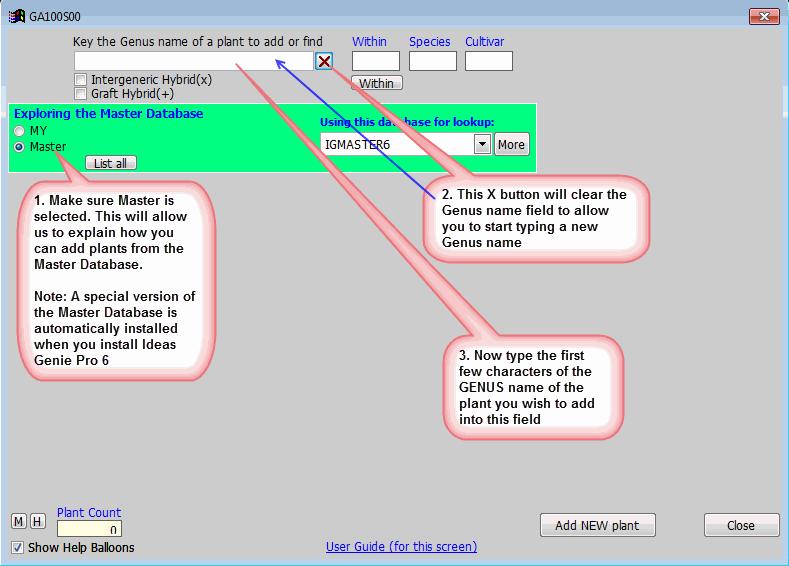
Screen GA100S00 will appear.
Screenshot GA100S01-01
In this example, we will add the plant Phlox paniculata ‘Franz Schubert’
Referring to Screenshot GA100S00-2, type a few characters of the Genus name - Phlox.
By doing a lookup in the Master Database installed on
YOUR computer, Ideas Genie uses predictive text to offer possible matches
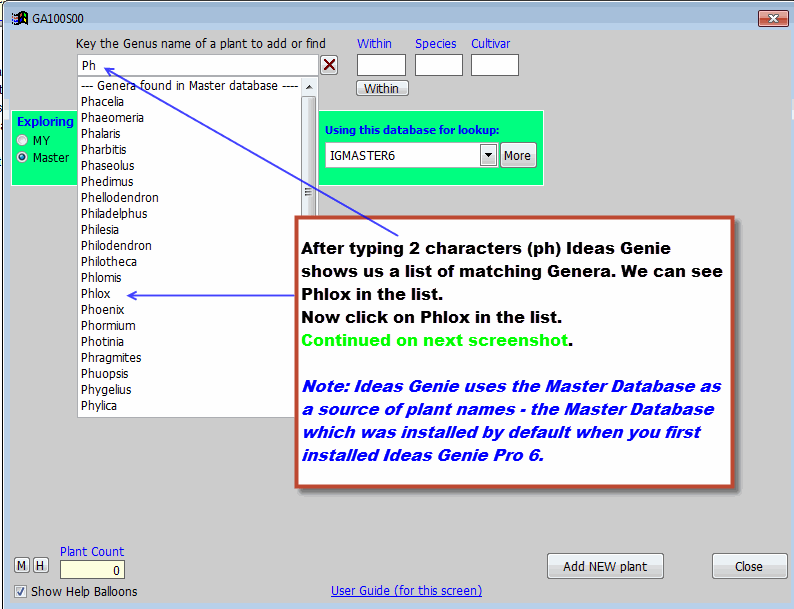
After typing 2 characters (ph) the predictive text list looks like this:-
Screenshot GA100S00-2
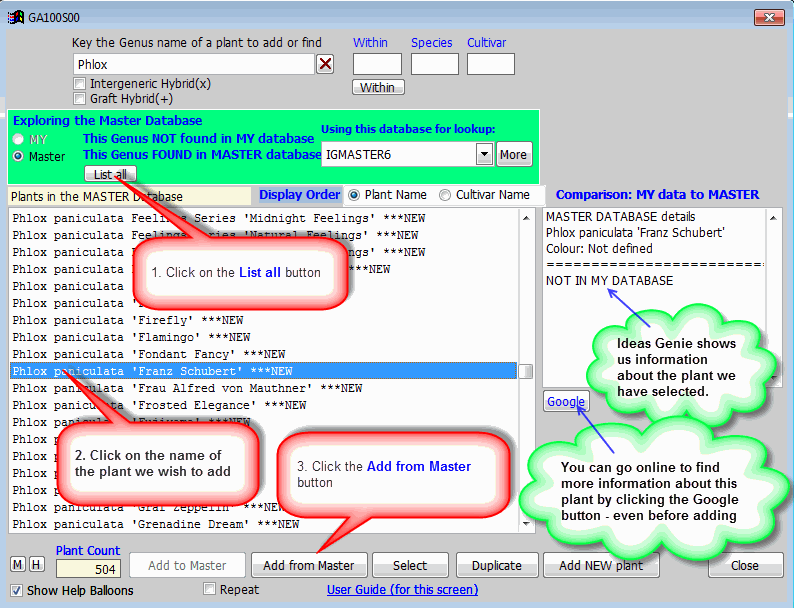
After clicking on Phlox in the list we continue as described in this screenshot:-
Screenshot GA100S00-3
After clicking the Add from Master
button, you will receive a message:-
Plant has been added from Master Database.
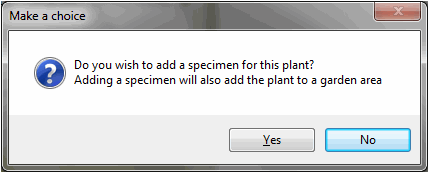
You will then be prompted - Do you wish to add a specimen for this plant
For this exercise, click No.
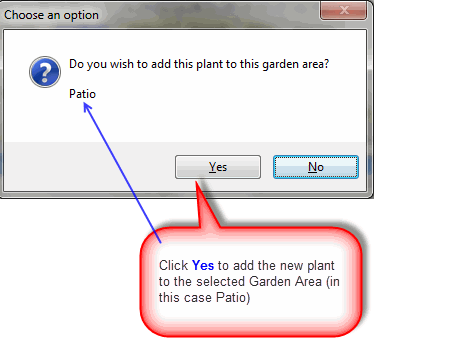
You will then be
prompted with this dialog box
Click Yes to add the plant to the selected Garden Area
Adding a Specimen record for a Plant
If you have
bought or acquired a living plant, that plant is referred to as a Specimen in Ideas Genie Pro. There is no limit to the number of Specimen Records you can
enter for any given plant. e.g. you bought a plant from Supplier A in 2010, another from Supplier B in 2015, etc.
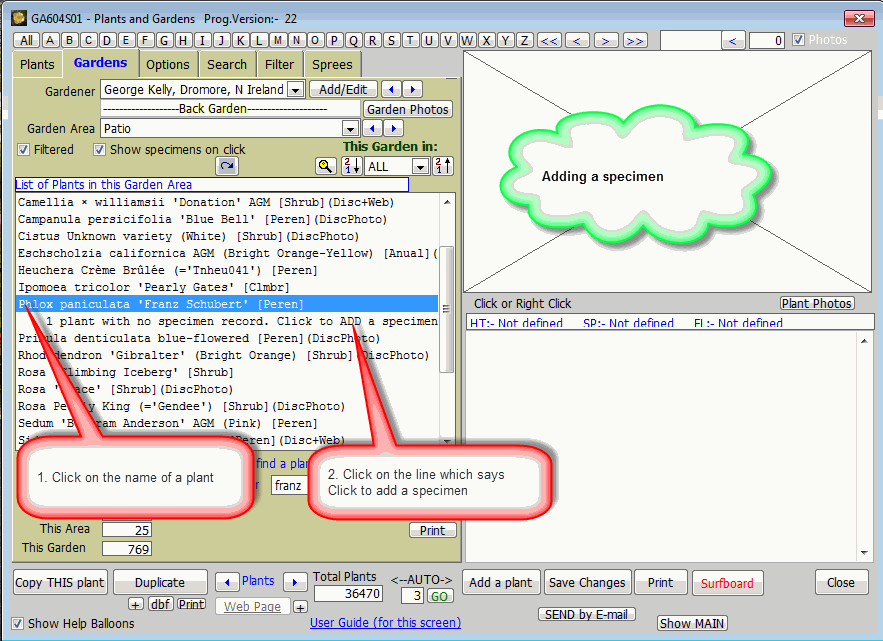
To add a specimen record, continue using
the program GA604.
Do steps 1 and 2 as shown in Screenshot GA604S01-3.
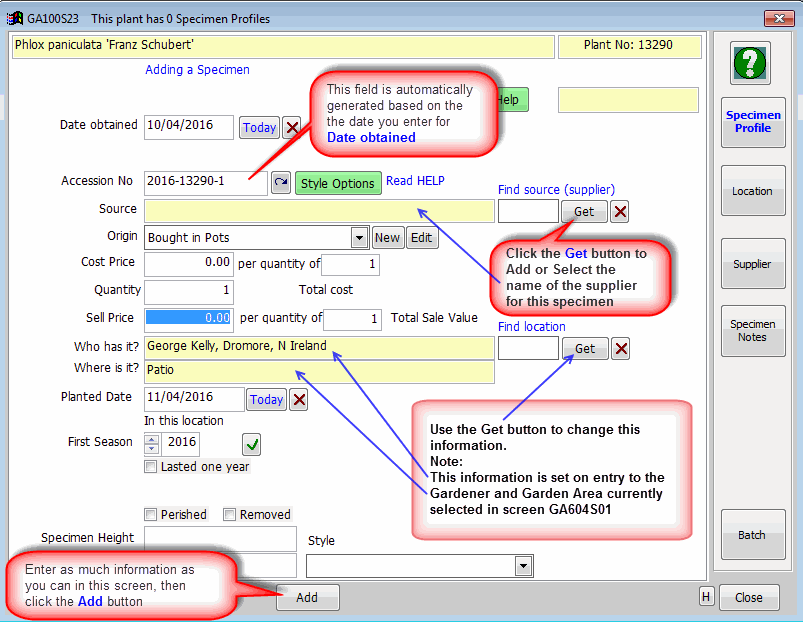
Screen GA100S23 appears.
Referring to Screenshot GA100S23-1 enter as much information as possible about the specimen of the plant.
Then click the Add button
Screen GA604S01 will reappear.
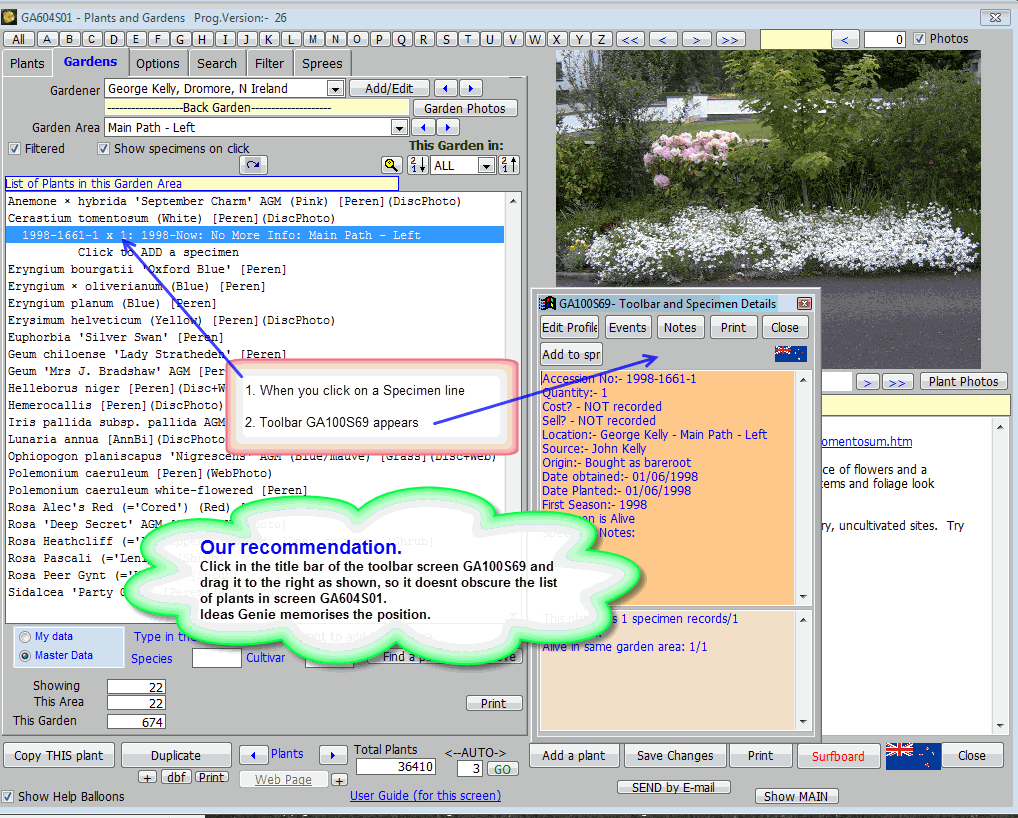
Click on the name of the plant to which you added a specimen (above).
A Toolbar (screen GA100S69) will appear and again it may obscure the screen GA604S01
About Toolbar GA100S69
This toolbar appears when you click on a SPECIMEN line in screen GA604S01.
This toolbars should also be repositioned so as not to obscure screen GA604S01.
Refer to screenshot GA100S69-2 for our recommendation on how to control toolbar GA100S69
NOTE: The Toolbar GA100S69 will disappear if you click in “empty space” on screen GA604S01
Our sample plant and Specimen record
Click on the Plants tab, then click the All
button (or the C
button to show all plants beginning with C).
We have included a plant as a sample - Campanula lactiflora 'Pouffe'.
Its one of the best plants in my garden.
Click on the plant name. Toolbar GA100S70 appears. Click the Edit (Plant Profile) option in the list. GA100S36 appears. This is one of the most important screens in the system.
After playing with that, click the Close button to return to the initial screen.
Click on the plant name again.
Below the plant name you will see a sample specimen.
Click on the specimen line. The toolbar GA100S69 appears.
Click on the Edit profile button.
Screen GA100S23 appears.
Click on the buttons to explore that screen.
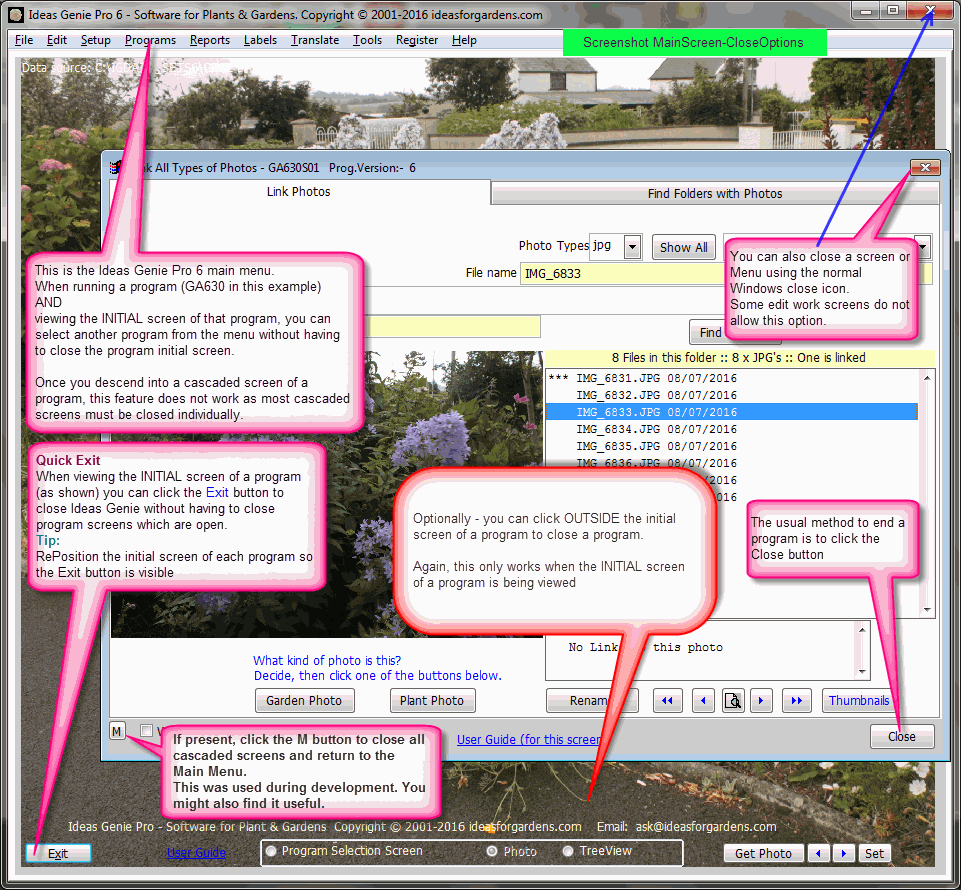
- Closing Programs
Refer to this screenshot - A few useful tips are explained
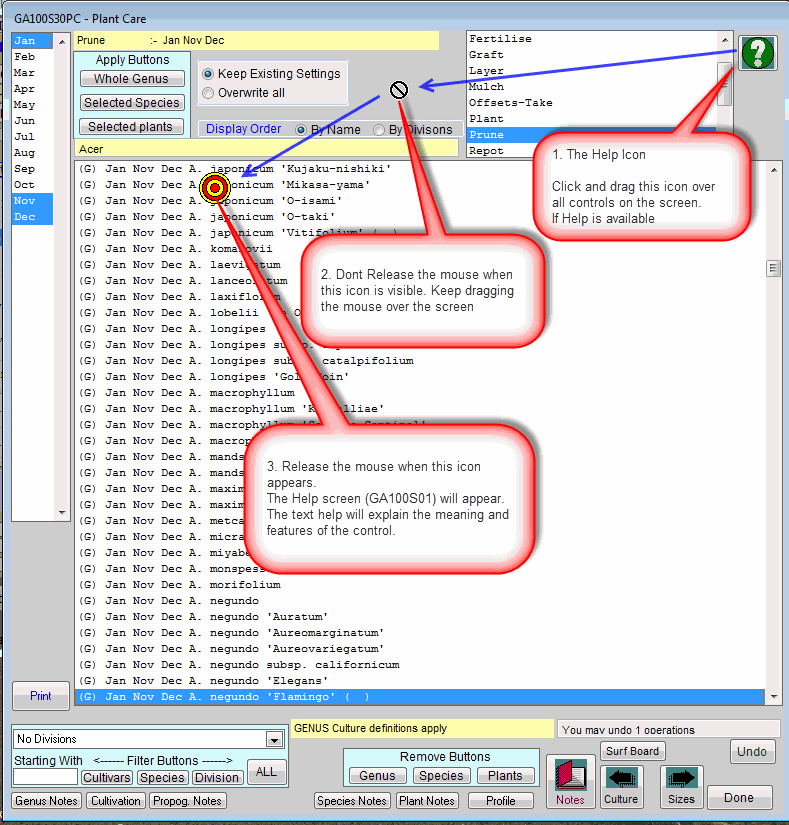
- Exposing Help
In addition to this User
Guide, Ideas Genie has Text help in some screens.
Help delivered using the ? icons
Text Help was present in the legacy versions of Ideas Genie and have been retained.
Make sure you know how to use this most informative help
Screenshot GA100S30PC-1
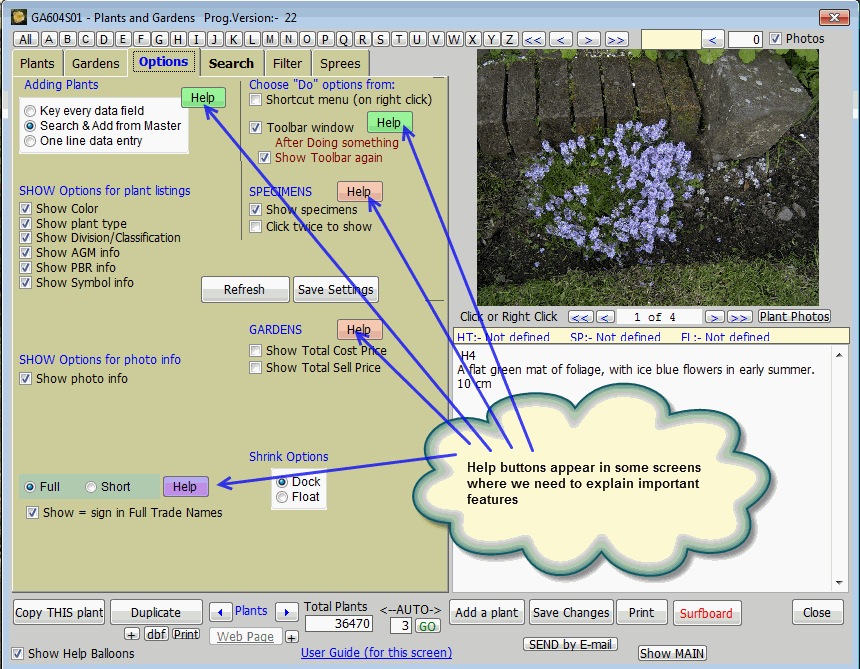
Help delivered using Help buttons and i Icons
More conspicuously, text Help is provided under Help buttons placed beside the controls where we need to explain important features.
See Screenshot GA604S01-Options-1 for example of most obvious Help buttons
and Screenshot GA604S01-Spree-1 for an example of the i icon help button which does not need translation by our non-English speaking users.
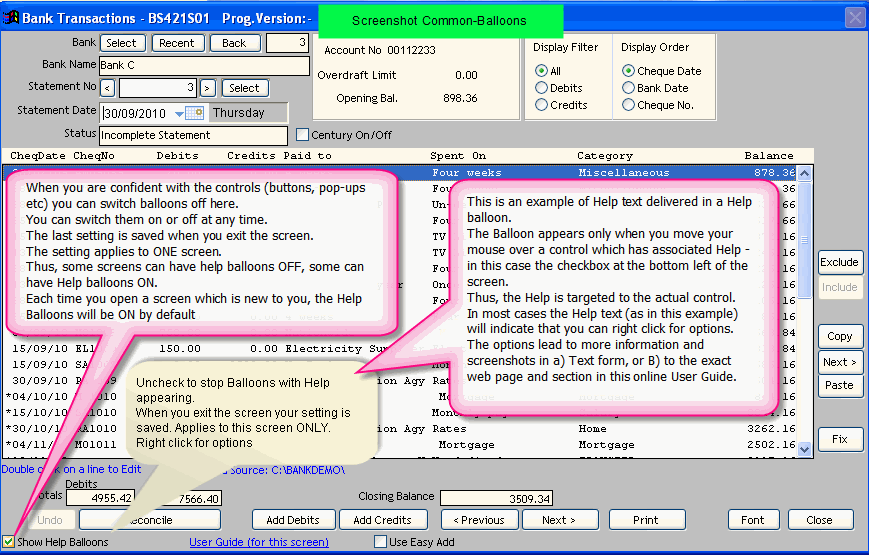
Help Balloons
Screenshot 1
Keep Show Help Balloons checked in new screens until you've found your way around. Do what it says in Balloons when provided for a control.
If it
says Right click, then right click on THAT control and you'll find immediate Text help, and a link to TARGETED help to the User Guide.
User Guide links
Click the User Guide link at the bottom of each screen where available. This
takes you to a Targeted web page on this User Guide where RELEVANT Help is available - with screenshots.
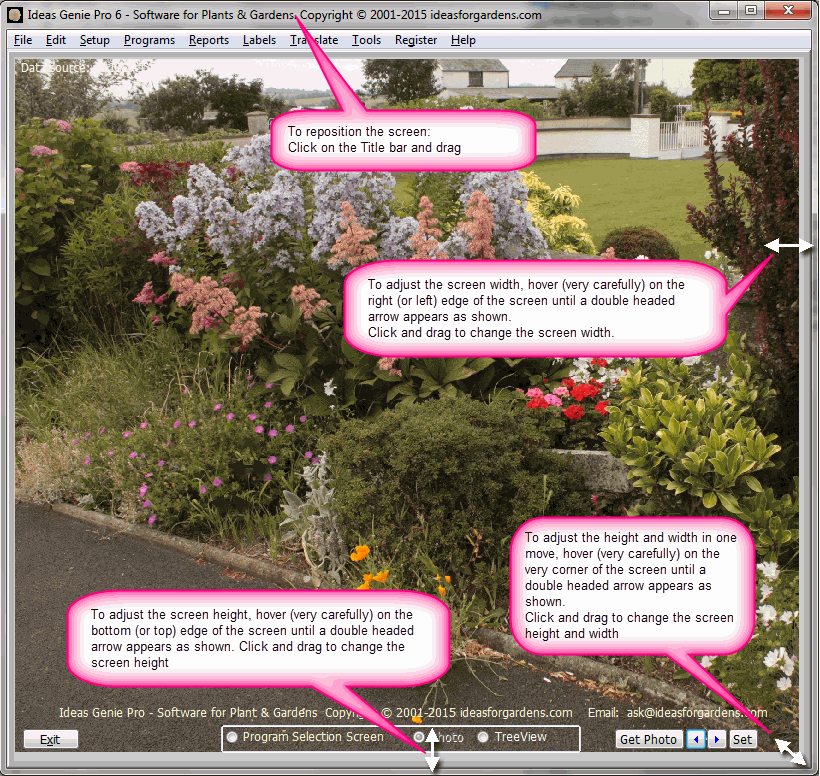
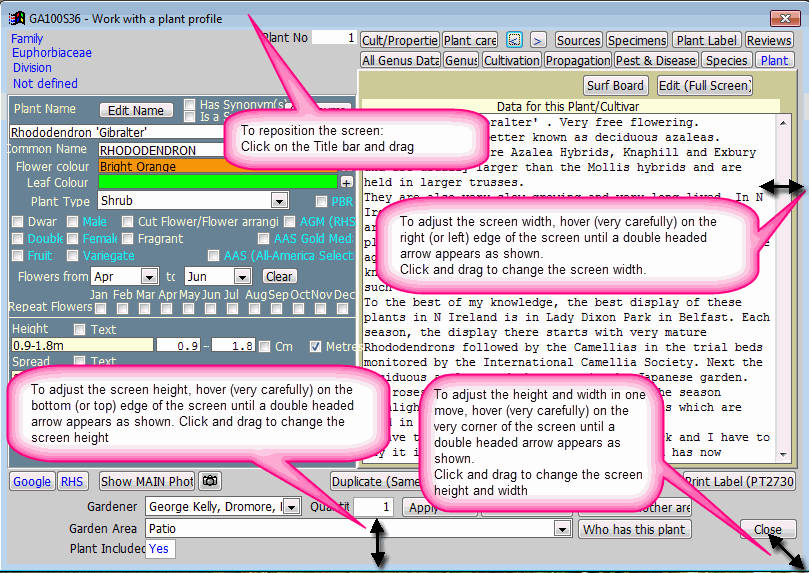
- Resizing and repositioning a screen
View Screenshot GA100S36-1 to learn about repositioning and resizing screens
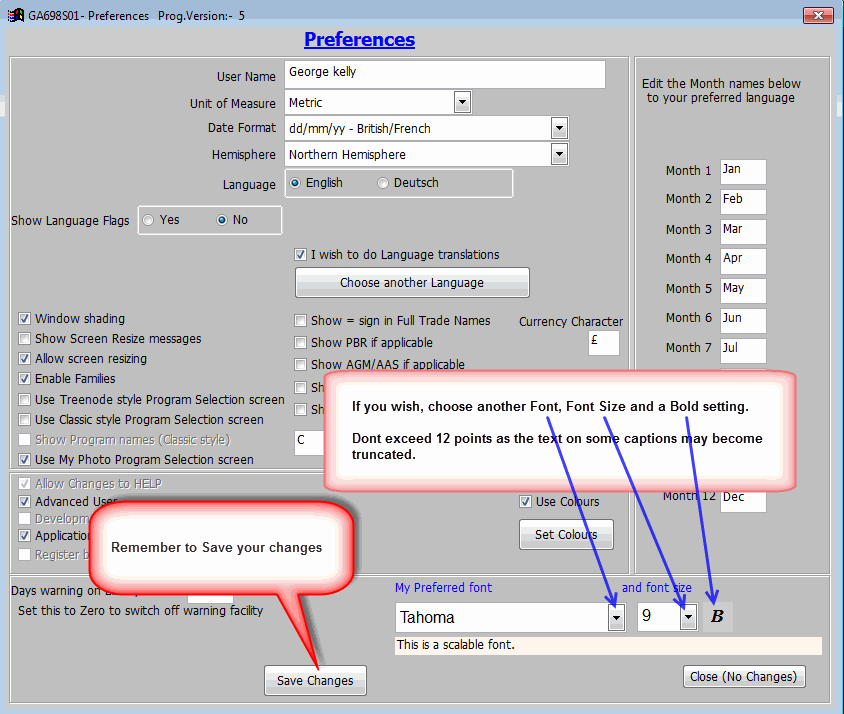
- Choosing a font and font size
Click the Setup tab on the Menu.
Start the program Setup>Preferences - GA698
Choose a Font and Font size (optional - the default is 8pt Tahoma)
See Screenshot GA698S01-1
The
screens in Ideas Genie look very well at 8pt Tahoma.
Change the font or make it bigger if you wish but if going to 12 point, you may need a wide screen
monitor to see all the text in some screens.
We recommend a maximum of 12 point.
- You’ve covered the basics
Now try these programs yourself...
Link Photos - GA630
To learn more about specimen profile and screen GA100S23, visit this User Guide page
|
