|

Using Right Click to expose shortcuts
For your convenience, many additional options and features can be exposed by right clicking on some controls.
Examples:
- Try right clicking on the Add button In the program Plants and Gardens - GA604
In each case, a shortcut menu appears with a selection of useful options
User Guide links (Hyperlink)
Targeted help is available in many Ideas Genie screens.
Screenshot - Common-UserGuideLink
Left clicking (normal) on the link
takes the user to your preferred User Guide - local (on your computer), or online (our website)
The link takes you to the exact Topic in the User Guide, relevant to the screen you are using.
Right clicking on the link
will open a shortcut Menu
Screenshot common-UGlinks-Shortcut.
The shortcut menu offers these options:
- User Guide on-line
Click to open the on-line User Guide to read help for the current screen.
- Open the User Guide local
Click to open the local User Guide (on your computer) to read help for the current screen.
- User Guide Options
This takes you to screen BS100S04 where you can choose your preferred User Guide.
Screenshot BS100S04
Choosing your preferred User Guide
In screen BS100S68 (referring to
Screenshot GA100S68) you can choose your preferred User Guide to use as default when you left
Click on links in shortcuts in the Ideas Genie screens.
The preference you choose applies to all screens with User Guide links.
More about User Guide shortcuts
The User Guide shortcut is shown in Screenshot common-UGlinks-Shortcut
When you right
click on a control which has Help, a shortcut menu appears
When you click a User Guide link from a shortcut menu the link opens a page on the User Guide which explains the functionality of that specific control.
Help Balloons and the Show Help Balloons Checkbox
Many screens in Ideas Genie deliver help in the form of Help Balloons
.
Screenshot Common-Balloons
A Help Balloon
may appear when you pass the mouse over some controls.
The Help text inside the Balloon gives help specifically for that control.
When you first open a (new to you) screen, the Show Help Balloons checkbox will be checked (the default in ON).
After you have explored the screen and are familiar with all the controls, you can uncheck the Show Help Balloons checkbox.
The setting is obeyed immediately.
When you exit the screen, the setting is saved.
Next time you enter THAT screen, the setting is restored (Checked or unchecked)
Settings are stored specifically for each screen.
Thus, if you can have Help Ballons checked in one screen and unchecked in another.
You can check or uncheck the Show Help Balloons checkbox at any time, allowing you to do a refresher
on the Help delivered by the Help Balloons.
If you use the preferences program to switch on a feature which you have not used before, you may see
extra controls on certain screens.
Be sure to check the Show Help Balloons checkbox when you open the screen(s) which exhibit that
feature.
Date Pickers
You can type a date in the numeric portion of the Date Picker, or you can click on the Calendar icon and
use the Calendar control to select a date.
When you click into the field, the following shortcuts apply:-
- type the character t to change the date to Todays date
- type the character + (plus) to change the date to Next Day
- type the character - (minus) to change the date to the Previous Day
- type the character m to change the date to
Beginning of month
- type the character h to change the date to
End of Month
- type the character y to change the date to
Beginning of Year
- type the character r to change the date to
End of Year
Tips:
To go back a few years, click y then -
(you are now showing the last day of the previous year)
Repeat y then -
to go back one more year etc.
Use r and + to go the other way
The date pickers used in Ideas Genie are unique in that the day name is shown when you type or select
a date, or use one of the shortcuts.
Reserved
Multi selecting in a Listbox.
There are two methods.
a) To Multi-select a number of sequential lines (i.e. appearing one after the other in the list)
Screenshot BS421S01-1-MultiCns
- Hold the Shift button down and Click the first transaction required
- Hold the Shift button again (or continue to hold it down) and Click the last transaction required
All the transactions between the First and Last transactions clicked (inclusive) will be selected (blue)
- Then click the Exclude (or Include) button as required
a) To Multi-select a number of items which are NOT listed sequentially
Screnshot BS421S01-1-MultiRandom
- Hold the Ctrl button down and Click the first transaction required
- Hold the Ctrl button again (or continue to hold) and Click the next transaction required, anywhere in the list
As you click, each line becomes highlighted and the previously clicked lines remains highlighted (blue)
- Continue Ctrl-Clicking as many as you wish
- Then click the Exclude (or Include) button as required
The Retry button
When you attempt to select a Database Location Record (e.g. from a popup) and that database is on a
device which is not connected, a Warning Message in red will appear on the screen saying:
Drive is not Ready or Invalid
This Screenshot shows the message and Retry buttons in the Backup Program
The feature is widely used in other programs in Ideas Genie. The recovery procedure is the same:-
Connect the device (External drive, Flash Disk etc) and click the Retry button.
If the device Volume Serial Number (VSN) matches the VSN in the Database Location Record then the warning message will disappear.
This feature is a good example of the value of Database Location Records in relation to removable disks.
Note:
In the case of Servers, Ideas Genie uses the UNC path in Data Location Records, not Volume Serial Numbers.
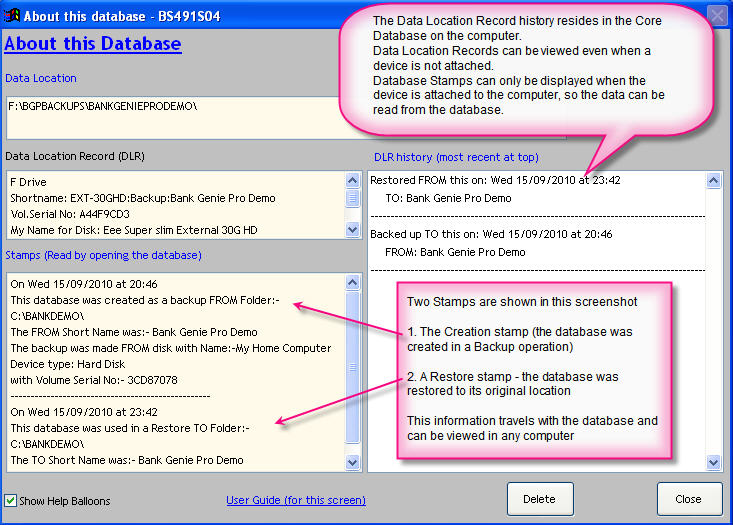
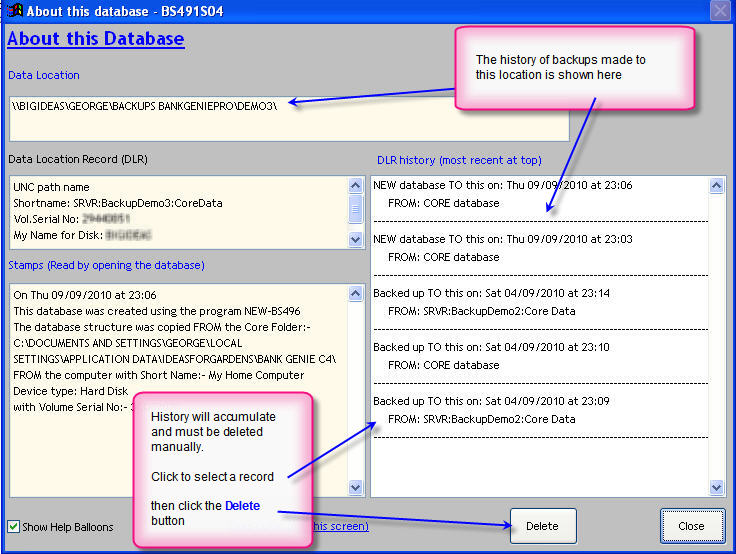
The More buttons (= More Information in relation to Data Location Records)
The More button is a common feature in programs which display Data Location Record information.
Heres an example showing the More buttons in the program Backup - GA691
Screenshot
Screen GA691S04 (a common screen) appears when you click the More button
Screenshot
Click the More button to:
- view an information summary about the selected database
- view Database Stamp records
- manage the History log of Backup, Restore and Database Creation (New) records
History must be deleted manually as shown in the Screenshot
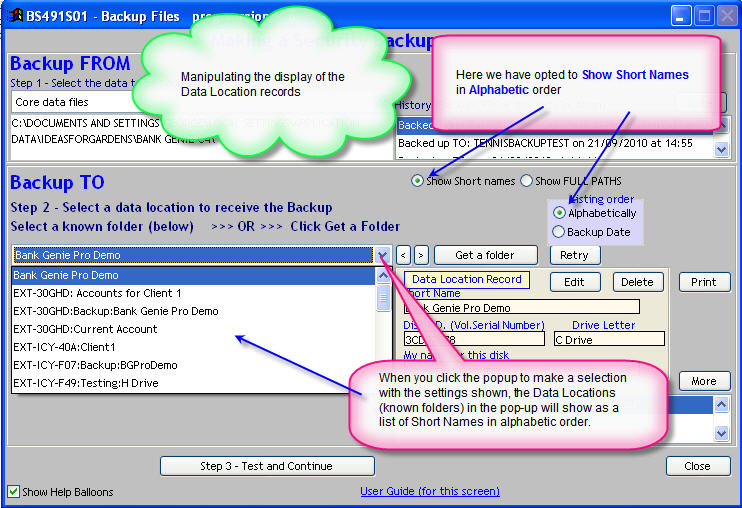
Show Short Names and Show FULL paths
A set of radio buttons with two options which feature on Backup and Restore program screens.
This Screenshot is a typical example.
The radio buttons are used to change the contents of the Data Location popup display order of the list
of Data Locations folders you to select a folder for receiving your backup
- Show Short Names
You can display a list of Short Names in the pop-up.
The Short Names are as you defined in your Data Location Records
Short Names can be edited to be meaningful to you
- Show FULL PATHS
Select this option to change the popup list to show the full paths and folder names where data is located.
Next topic
|
